
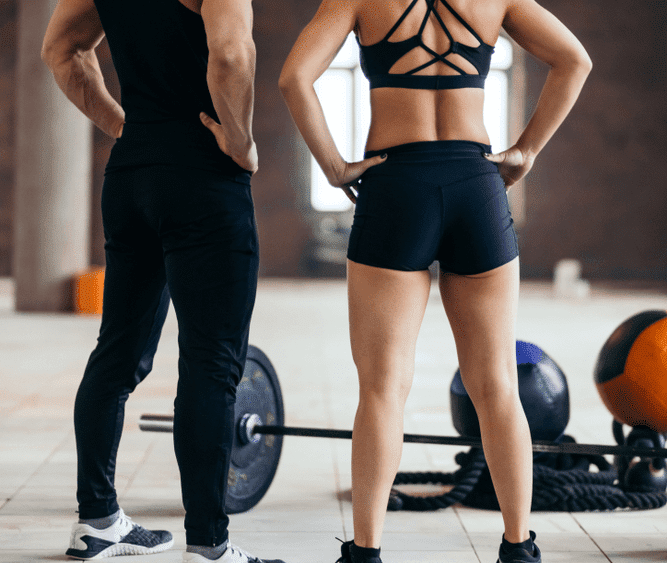
The Best 5 Glute Exercises Guaranteed to Have Your Buns on Fire!

Strong glutes not only look good, but can help to improve your posture, strength and overall athletic performance. The glutes are the largest, most powerful muscle group in the body, however, are all too often overlooked. Many of us spend our working days sitting on them which may lead to the muscles becoming ‘lazy’, which can lead to poor mobility, back pain and also make them difficult to target and ‘feel the burn’ during certain exercises.
While glute-specific training has skyrocketed in popularity among females, it is still a much-neglected muscle group for men. You can incorporate any of these exercises into your lower body routine to fire up your glutes or combine all 5 together to create a seriously powerful glute-boosting workout. Perform a warm up set or activation before each exercise to ensure your muscles are primed and prepared for maximum burn!
-
Barbell Hip Thrusts:
Barbell hip thrusts are second to none when it comes to glute-focussed exercises, often hailed as the holy grail of booty-building. It’s a fantastic exercise for anyone new to lifting to progressively overload, as you can make relatively quick progress increasing the weight. Many people find they can lift much heavier weights on hip thrusts than on other compound exercises such as back squats. A barbell pad is recommended as an essential item for comfort during hip thrusts, if you don’t have a barbell pad, you can roll up an exercise mat from the gym around the bar to protect your hip bones during the exercise. If you’ve ever tried barbell hip thrusts without padding, you’ll understand why! 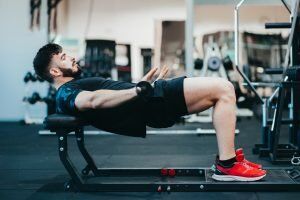 Activation: 15 reps on light weight to pre-exhaust your glutes before your heavier sets
Reps: 10-12 reps (depending how heavy your working set is)
Sets: After activation, build up to a challenging weight with further warm-up sets before reaching a challenging weight, then perform x 3 working sets
How to perform a perfect barbell hip thrust:
- Set up the barbell with your chosen weight parallel to the bench.
- Position yourself on the floor, with your shoulders and shoulder blades leaning against the bench. If they don’t reach the bench when you are sitting on the floor you can raise your butt a little bit off the floor or sit at the base of a decline bench (this is ideal for anyone under 5’8) or use a box, whatever feels most comfortable for you.
- Roll the barbell toward you, over your legs until it’s directly over your hips.
- Now, bring your knees up and feet towards you so they’re in a comfortable position, pointing slightly outwards and slightly wider than shoulder width apart. Don’t bring them in too close or too far out as this will target your quads or hamstrings instead of the glutes. Practice the motion with bodyweight or light weight first, you will know your feet are in the right position if when you fully extend into the lift, your knees are at a 90 degree angle to the floor (as in the image above).
- Put your elbows on the bench and your hands on the bar to steady it. It is very important that your body is aligned and your spine and neck are neutral. Keep your chin gently tucked throughout the exercise and don’t lean your neck back. A good tip is to imagine you’re trying to keep an egg in place under your chin throughout the movement, don’t have your chin tucked too far or the egg will crack, don’t lean it back too far or you would drop the egg.
- Take a deep breath in, then exhale all the air out through your mouth and brace your core.
- Drive through your heels and squeeze your glutes to lift your hips (and the barbell).
- Come down smoothly, with your core still braced.
Beginner Variation: Use a kettlebell or dumbbell at a comfortable weight rested on your hips with a mat underneath to protect your hip bones. Follow the same steps above to execute the movement, but gently hold the kettlebell or dumbbell in place and make sure you are pushing the weight up by squeezing your glutes.
Make it harder: add a resistance band above the knees
-
Sumo Deadlift:
All deadlift variations target the posterior chain (the back of the body) including the lower back, glutes and hamstrings. However, by standing in a wider ‘sumo’ stance with your toes pointed slightly outwards like this variation, this decreases the distance your hips need to travel, which loads the glutes and hamstrings more than a conventional deadlift. 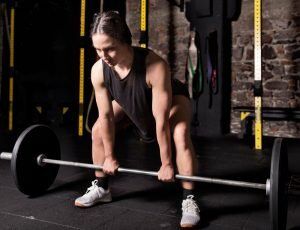 Tip: Really focus on squeezing your glutes at the top of this exercise and maintain tension in your glutes on the way down lowering the weight. This point of focus is known as the Mind Muscle Connection and has been shown to be incredibly effective at improving muscle activation and increasing growth, so definitely worth it. Read everything you need to know Our guide to Mind Muscle Connection contains everything you need to know and tips to improve your mind muscle connection and get maximum gains from your training.
Activation: 20 bodyweight glute bridges (add a resistance band above/below your knees for maximum glute activation), squeezing your glutes and spreading your knees outwards at the top of the movement, bring knees back in slightly and lower (if doing straight after barbell hip thrusts above, you can skip this activation and go straight into your warm up set).
Reps: 10-12 reps (depending how heavy your working set is)
Sets: After activation, build up to a challenging weight with further warm-up sets before reaching a challenging weight, then perform x 3 working sets
How to perform the perfect sumo deadlift:
- Start with the bar loaded on the ground in front of you. Approach the bar and stand in a wide stance, feet pointing slightly outwards.
- Bend at the hips as if sitting back with the spine in a neutral position, grip the bar with your arms positioned directly below the shoulders and inside the legs. You can choose a grip which feels comfortable for you, many choose to opt for a mixed grip.
- Take a breath, look forward with your head and chest up, squeeze shoulder blades together (do not roll shoulders forward) and brace your core. Drive up through the floor from your heels, maintain a neutral spine and extend through the hips and knees.
- As the bar passes past the knees, lean back, drive your hips forward and squeeze your glutes hard at the top of the movement, pulling your shoulder blades together. Be careful not to lean too far back or swing your hips too far forward into the movement at the top to avoid hurting your back, try to focus on driving the hips forward by squeezing your glutes.
- Return the weight to the group by bending at the hips, controlling the weight on the way down.
3. Split Squats:
There are several variations of split squats which are all effective at targeting the glutes. Split squats test your balance and coordination, build serious single-leg strength, warm up hip flexors and target the glutes. As well as working glutes and quads, the move also engages your hamstrings and calves and builds your core strength. As a single limb exercise, split squats are effective for increasing muscle activation, help to balance out any leg or glute muscle imbalances and prevent injury. Because both feet remain in contact with a surface throughout the exercise, you’re able to go a little heavier with the weight than you would with a lunge because you have much more stability.
Let’s begin with the Bulgarian Split Squat, as shown below: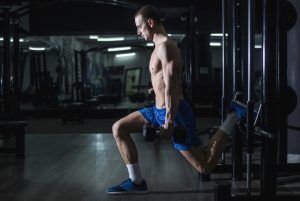 Bulgarian Split Squats have your rear foot elevated and resting on something sturdy such as a bench. You can perform this move with just bodyweight, holding a dumbbell in each hand as shown above, with a barbell on your back or on a smith machine.
How to perform the perfect Bulgarian Split Squat:
- To begin, stand facing away from the bench, holding a dumbbell in each hand or with a barbell across your upper back. Rest one leg behind you on the bench, with the front of your foot facing down (where your laces would be).
- Squat downwards with your standing leg until the knee of the rear leg almost reaches the floor.
- Push back up, driving through from your front foot to return to the start position.
Alternatively, there is the Reverse Lunge Split Squat where you begin in a reverse lunge position, with your rear foot placed on the floor 2-4 feet behind you. This can be done again with body weight, dumbbells, on a smith machine or with a barbell placed on your back as you would with a regular squat. The latter is shown below:
How to perform the perfect Reverse Lunge Split Squat:
- Place a barbell on your upper back with an overhand grip, just as you would for a back squat, or hold a dumbbell in each hand. Stagger your stance, with your front foot 2-4 feet in front of your rear foot. Stay on the toes of your rear foot. This is your starting position.
- Lower your hips down until your front thigh is at least parallel to the floor. Push through your front leg’s heel, and drive the hips and knees upwards, to return to the starting position. Really focus on feeling the movement in your glutes.
Reps: 10-12 reps (depending how heavy your working set is)
Sets: Build up to a challenging weight with further warm-up sets before reaching a challenging weight, then perform x 3 working sets. These are a killer, trust us.
-
High Step-Up
This classic strength and conditioning exercise is one of the best glute burners you can perform to improve power and strength. It’s another single-leg movement so fantastic for improving balance, stability and helping to correct any imbalances you have in your leg and glute muscles. High step-ups target all of the main large muscles of the legs, but particularly the glutes and hamstrings and really helps to develop a nice, shapely peach! While this exercise is called High Step-Up, you should choose a step, bench or box that is at a height that’s challenging, but not too high that you aren’t able to perform 10-12 reps. The higher the step, the more you work your glutes because of the increased flexion at the hip. The lower the box, the more your quads and calves will be targeted. The secret to selecting the right height for you is to go as high as you can without rounding your lower back, just above the knee tends to be about right.
 It is intended to be difficult and you should be struggling to perform the last few reps, so challenge yourself here. If you haven’t done these before, start on a lower step to nail your form and balance before moving onto a higher step. If you are a beginner, start with bodyweight and if you find this challenging, get used to executing the movement correctly before adding weights. Otherwise, you can perform this move holding a dumbbell or weight plates in each hand, or holding a single dumbbell, weight plate or kettlebell towards your chest. Again, choose a weight that feels challenging but still enables you to perform the exercise correctly for your full rep range.
How to perform the perfect High Step-Up:
- Stand straight with one foot up on a bench (or step/box) holding your chosen weight. If using 2 dumbbells or plates, either hold one in each hand with your arms straight or at your chest (whatever feels most comfortable and balanced for you); otherwise, hold a single weight towards your chest.
- Push off from your top foot and step up onto the bench (or step) with both feet. Step down back onto the same foot, keeping the other foot on the bench and repeat for 10-12 reps on each leg. Try to visualise and really feel your glute muscles working to push your whole body up using your elevated leg.
Reps: x10-12 reps on each leg so 20-24 reps in total per set
Sets: x3 sets
Tip: If you are struggling with your balance, keep your eyes focussed on one particular point in front of you throughout the entire set. Stick at it and your balance will soon improve!
-
Tempo Goblet Squat
Well, we had to get some form of squats into the mix didn’t we! As opposed to a regular squat, a goblet squat requires you to stand with your feet wider than shoulder width apart with toes pointing slightly outwards (similar to the sumo deadlift) so that when you squat low to the bottom of the movement, you have room to fit your arms holding the dumbbell or kettlebell between your legs.
While there’s no denying you can go significantly heavier on a barbell squat, a goblet squat puts much less stress on the spine, allows you to achieve full depth and a greater range of motion due to the wider stance. They are a great addition to any lower-body training to improve mobility and will massively improve your general squatting form.  By incorporating tempo training into this exercise, it increases time over tension, so your muscles are put under stress for a longer duration, which increases strength and muscle gains! In this instance we will use the 4, 2, 1 count (4 seconds down, 2 second pause at the bottom, 1 second powerful drive up).
How to perform the perfect Tempo Goblet Squat:
- Hold a dumbbell or kettlebell with both hands at chest level, palms facing (again, you want a challenging weight but one that still allows you to execute the movement correctly).
- Set your feet wider than shoulder width apart with your toes pointing slightly outwards.
- Brace your core and slowly sink your bum down (for 4 seconds) into the squat, sitting your weight back (as if there’s a seat behind you) until your elbows reach the inside of your knees. Sit between your legs and open your hips, pushing your knees out.
- Keeping your heels firmly pressed into the floor, pause at the bottom for 2 seconds.
- Drive the weight back up through your heels to thrust back up in a powerful 1 second movement back to the standing position, squeezing your glutes hard at the top.
- Repeat with the rest of your reps.
Tip: If you find you feel any squat more in the quads than the glutes, add a plate under your toes as this will disengage your quads and help to shift the focus onto your glutes.
Finisher:
Thought you were finished? Not quite I’m afraid! Whether you’ve combined these exercises into one killer routine or just incorporate them individually into your current lower-body training, for maximum activation and growth, you want to really annihilate your poor cheeks.
So, using just bodyweight or adding a resistance band above or below the knees, perform just one set of each of these (phew):
- Fire hydrants – x15 reps on each side
- Glute bridges – x20 reps
- Frog pumps (like a glute bridge but with the soles of your feet together)
Smashed it!! Give yourself a massive pat on the… back (your tush might be too sore)!
No Comments yet!