

If you learn how to execute the perfect bent over barbell row, then you unlock one of the best workouts for your entire posterior chain; traps, rhomboids, lats, biceps and posterior deltoids. In plain English, that means you get:
Tips on bent over barbell row form
- Stronger neck and shoulder blades to carry heavier weights in everyday life
- Enhanced ‘wing muscles’ for a greater (and cleaner) pulling power
- Toned arms, loaded with more strength to lift, pull and push
- Well-shaped shoulder muscles, which add to your growing upper-body strength
How to do a bent over barbell row
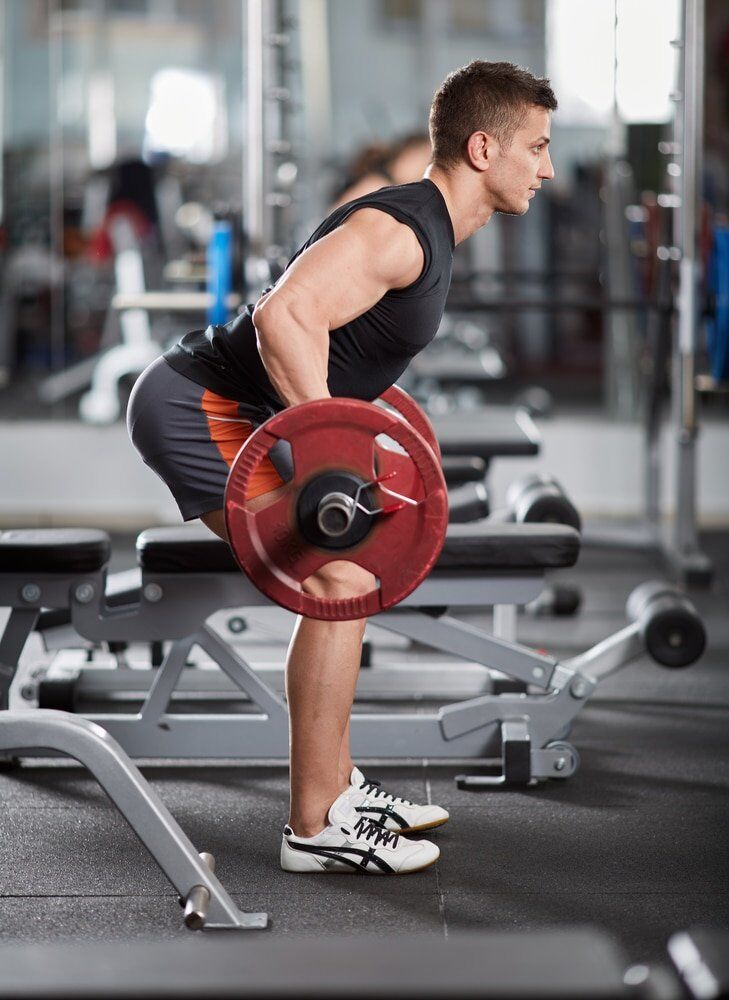
You can start off in a rack – or deadlift the weight from the floor. We’re going to focus on the latter here – saves those glares akin to bicep curling in the squat rack. Before we get into it, I can’t stress enough how important it is to recognise your ability to do this workout in the first place. — If you suffer from any kind of back problem — WHATSOEVER — then I can’t recommend that you do this. If that’s the case, stop reading now and consult your physician first. Same goes if you have heart trouble, blood pressure problems or any sort of condition that affects your breathing. —How To Do A Bent Over Barbell Row
- Get in the right stance
If you deadlift, then you’re going to find this part easy.
Slip your feet under the bar so the metal acts as an ‘equator’ across the very centre of each foot. You want it to split them in half from heel to toe (not from shin to toe). Now imagine a vertical line drawn from your shoulders to the floor – you want your feet just a touch outside this line. Tilt your hips forward slightly. Straighten your upper spine and maintain the extension. - Bend down properly
Sit back slightly, so your hips drop and you automatically bend your knees (again, slightly).
Now pivot forward so your bum and hamstrings start feeling the strain of the bend. — Note: If you’re new to this workout or working out in general, then you may notice a significant strain in the back of your thighs. This is a sign that your hamstrings aren’t yet flexible enough to safely take the strain. So, exit the workout and start working on some lower body mobility exercises to develop that much-needed suppleness. You may then be able to revisit the bent over row after a few mobility-focused sessions. Don’t force it, as you can cause an injury that postpones your ability to do the row for even longer. — - Check your stance
To identify whether you’re in the correct position to grab the bar, you need to check the following:
The angle of your arms is almost vertical in relation to the floor The angle of your torso is almost horizontal in relation to the floor The angle of your neck is perfectly straight in relation to your spine The top of your head is pointing forward like an arrow Your eyeballs are fixed on a point on the floor directly below your face (not at your feet, hands, the bar, straight ahead, or to the side). - Grab the bar
Clutch the bar at shoulder-width – with your palms facing inwards towards your body.
(For a maximum test of strength, some people will consciously squeeze the bar throughout) - Check your stance (again)
See Step #3.
- Pull the bar
It’s ALL in your elbows.
Breathe out as you drive the points of each elbow towards the sky to lift the bar. Don’t think about your back – or your biceps – or even your fingers. Just take the weight in your forearms and smoothly launch the elbows to the sky like a pair of rockets. Push them back behind you – so your shoulder blades squeeze and the bar kisses your chest. Only push the elbows as far back as it feels natural to do. Don’t force any awkward movements. - Lower the bar
At the same pace as your lift, lower the bar back down to the floor.
Note: Some people prefer to keep the bar from touching the ground – others prefer to let it down completely and start again. I like the former … but I always make sure I’m lifting ‘pure’ – and not relying on the momentum of one lift to fuel the next. - Start again
Tips on bent over barbell row form
Avoid lifting from your back or biceps to avoid dangerous jerking Keep your feet flat at all times Resist the urge to look at your feet or the bar to avoid hunching right over If you notice any kind of dip in form, either lower the weight or exit the workout altogether Keep your elbows tucked close to the body at all times
- Avoid lifting from your back or biceps to avoid dangerous jerking
- Keep your feet flat at all times
- Resist the urge to look at your feet or the bar to avoid hunching right over
- If you notice any kind of dip in form, either lower the weight or exit the workout altogether
- Keep your elbows tucked close to the body at all times
No Comments yet!